Unlocking the Secrets of At-Home Facial: Mastering Skincare Like a Pro

Doing an at-home facial can be a great way to pamper yourself and care for your skin. Here are some steps to follow to give yourself an at-home facial like a total skincare pro:
- Cleanse your skin: Start by cleansing your face with a gentle cleanser to remove any makeup, dirt, or oil.
- Exfoliate: A gentle exfoliator slows away dead skin cells and reveals brighter, smoother skin. Apply the exfoliator in circular motions, avoiding the eye area, and rinse with warm water.
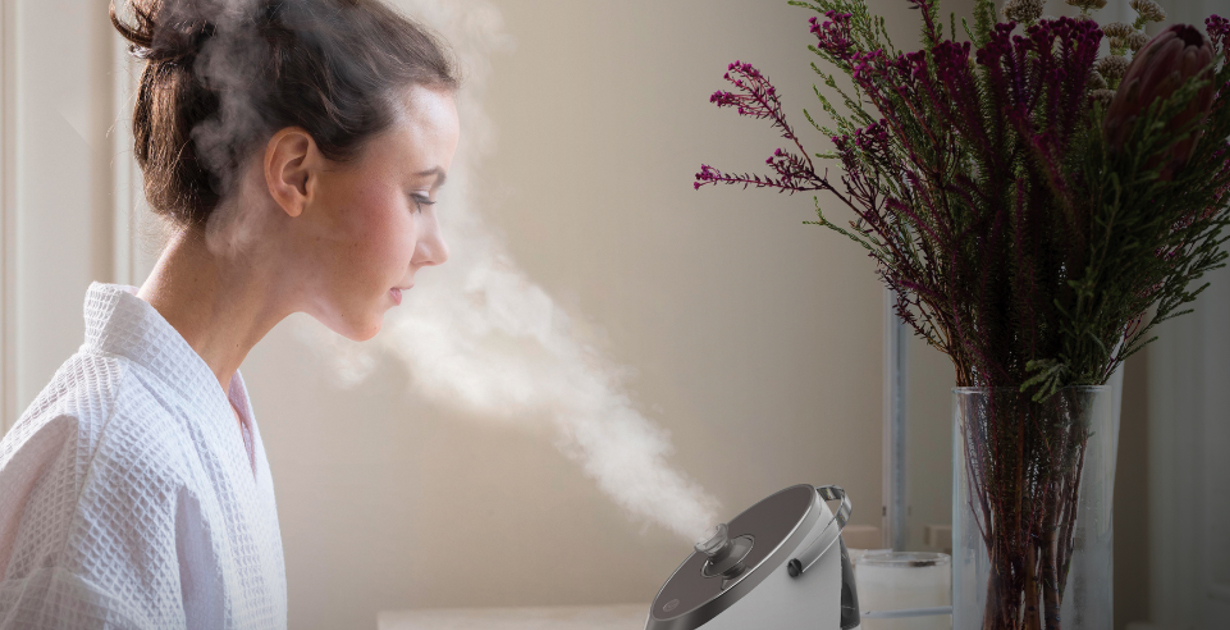
- Steam: Fill a bowl with hot water and lean your face over the bowl, placing a towel over your head to trap the moisture. Steam your face for 5-10 minutes to open up your pores.
- Apply a face mask: Choose a face mask that is suited for your skin type, and apply it to your face. Leave the show on for the recommended time, then rinse it with warm water.
- Tone: Use a toner to restore your skin's pH balance and tighten your pores. Apply the toner to a cotton pad and gently wipe it over your face.
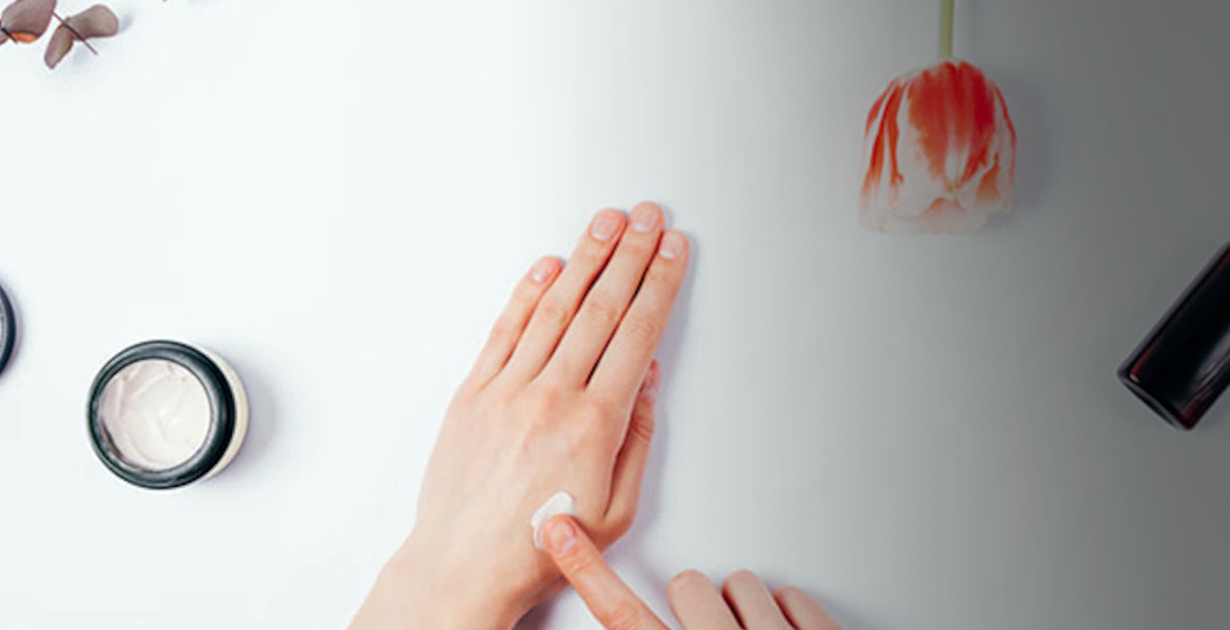
- Moisturize: Finish your at-home facial by applying a moisturizer to your face and neck to keep your skin hydrated.
Some additional tips to keep in mind:
- Be gentle with your skin: Avoid being too harsh during the at-home facial process. Use light pressure when cleansing, exfoliating and applying the face mask.
- Choose products wisely: Select skincare products that are suited for your skin type and concerns. If you have sensitive skin, look for gentle, fragrance-free products.
- Follow a routine: Consistency is critical when it comes to skincare. Establish a skincare routine that you can regularly follow to achieve the best results.
- Protect your skin: Wear sunscreen daily to protect your skin from harmful UV rays, even if you stay indoors for the day.
DIY Facial in 8 Easy Steps
If you want to give yourself a DIY facial at home, here are eight easy steps to follow:
- Cleanse: Start by cleansing your face with a gentle cleanser to remove dirt and oil.
- Exfoliate: Use a scrub or mask to remove dead skin cells and improve skin texture. Be gentle and avoid the delicate eye area.
- Steam: Boil water and pour it into a bowl, then lean over the bowl with a towel draped over your head to trap the moisture. The steam will open up your pores, making it easier to remove impurities.
- Mask: Choose a cover that suits your skin type and apply it to your face. Leave it on for the recommended time, then rinse it with warm water.
- Tone: Use a toner to remove dirt and impurities from your skin. This will also help to balance your skin's pH levels.
- Treat: If you have any areas of concern, such as acne or dark spots, apply a targeted treatment product.
- Moisturize: Apply a moisturizer to hydrate your skin and keep it looking healthy.
- Protect: Remember to apply sunscreen to protect your skin from UV rays. Even if you're staying indoors, UV rays can penetrate through windows.
It's essential to choose products that are suitable for your skin type and concerns. Depending on your needs, you can add or modify steps, such as incorporating a facial massage or using a sheet mask. The key is to enjoy the process and take some time to pamper yourself!
What Not to Do During Your DIY Facial
While a DIY facial can be a great way to pamper yourself and improve your skin, there are certain things you should avoid doing during the process. Here are some things not to do during your DIY facial:
- Don't use hot water: While steaming your face can help open up your pores, using hot water can damage your skin and cause irritation. Use warm water instead.
- Don't be too rough: Be gentle when cleansing, exfoliating and applying skincare products. Avoid scrubbing too hard, as this can damage your skin and cause redness or irritation.
- Don't use products that aren't suitable for your skin type: Using skincare products that aren't suitable for your skin type can do more harm than good. For example, using a product that is too harsh for sensitive skin can cause redness and irritation.
- Remember to patch test: Before using a new product, restoring and testing it on a small area of skin is essential to ensure you don't have an allergic reaction.
- Don't use expired products: Check the expiration dates of your skincare products before using them. Using expired products can irritate and may not be effective.
- Don't pick at your skin: While it can be tempting to pick at pimples or blackheads during your facial, it can cause further irritation and can even lead to scarring.
- Don't skip sunscreen: Even if you're staying indoors, UV rays can still penetrate through windows and cause damage to your skin. Make sure to apply sunscreen as the last step in your facial.
By avoiding these common mistakes, you can ensure that your DIY facial is effective and enjoyable.
FAQ's
An at-home facial typically involves a few simple steps: cleansing, exfoliating, steaming, masking, and moisturizing. Start by cleansing your face to remove dirt and oil, then exfoliate to remove dead skin cells. Next, use steam to open up your pores and apply a mask to address specific skin concerns. Finally, moisturize to lock in hydration.
The ingredients you choose for your facial mask will depend on your skin type and concerns. For oily or acne-prone skin, look for ingredients like salicylic acid or charcoal to help control oil production and clear pores. Look for masks with hydrating ingredients like hyaluronic acid or aloe vera for dry or sensitive skin. You can also look for masks with ingredients like vitamin C, retinol, or niacinamide to address specific skin concerns like dark spots or fine lines.
Yes, you can use household items for your at-home facial. For example, you can use honey as a natural cleanser, mask, sugar, or coffee grounds to make a DIY exfoliating scrub. A pot of boiling water can make a DIY steam treatment.
The frequency of your at-home facials will depend on your skin type and concerns. A facial may be beneficial for those with oily skin or acne-prone skin. If you have dry or sensitive skin, once every two weeks may be sufficient. Avoid doing facials too frequently, as this can irritate your skin.
After your at-home facial, it's important to avoid touching your face or applying makeup for a few hours to allow your skin to absorb the facial benefits fully. Ensure you drink plenty of water to stay hydrated, and continue your skincare routine. If you have any redness or irritation, avoid using harsh products or exfoliants and stick to gentle, soothing skincare.
